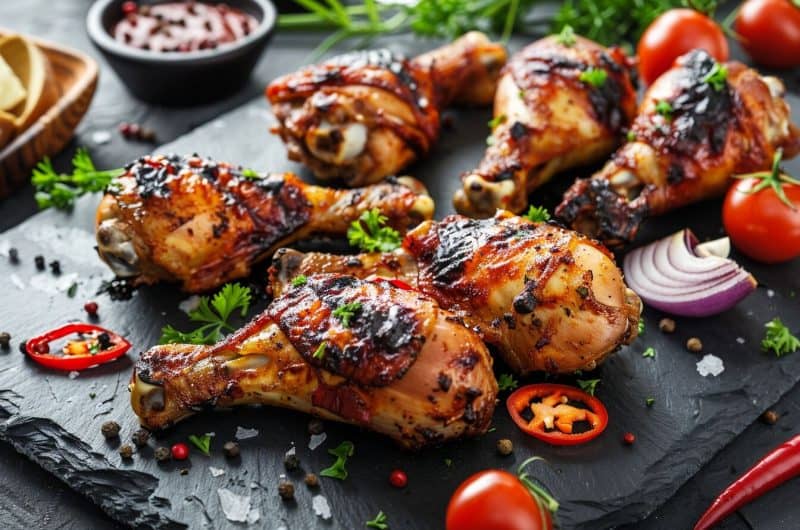
Awesome BBQ Butterflied Chicken Legs on the Weber Kettle Grill (Drumsticks)
Jump straight to the recipe card.
Igniting your Weber Kettle promises to delight, especially with BBQ Butterflied Chicken Drumsticks.
A couple of summers back, I stumbled upon this grilling gem. Why the buzz? Think charred skin, succulent meat, and speedy cooking.
Now, let me walk you through mastering this BBQ game changer.
In This Recipe
- Understanding Butterflied Chicken Legs
- Choosing the Best Drumstick to Split
- How to Butterfly Chicken Legs: Preparing the Chicken Drumsticks
- Grilling Butterflied Chicken Drumsticks
- Alternative Cooking Methods
- Tips and Tricks
- Step By Step Instructions for Butterflied Chicken Legs
- Serving Suggestions
- Concerns About Overcooking or Undercooking Chicken Drumsticks
- Safety Measures When Handling Raw Chicken
- Flavor Variations and Dietary Preferences
- Creating a Unique Marinade Using Unexpected Ingredients
- Conclusion
- Frequently Asked Questions
- Recipe Card: BBQ Butterflied Chicken Drumsticks on the Weber Kettle
Understanding Butterflied Chicken Legs
What are Butterfly Drumsticks or Butterflied Chicken Legs?
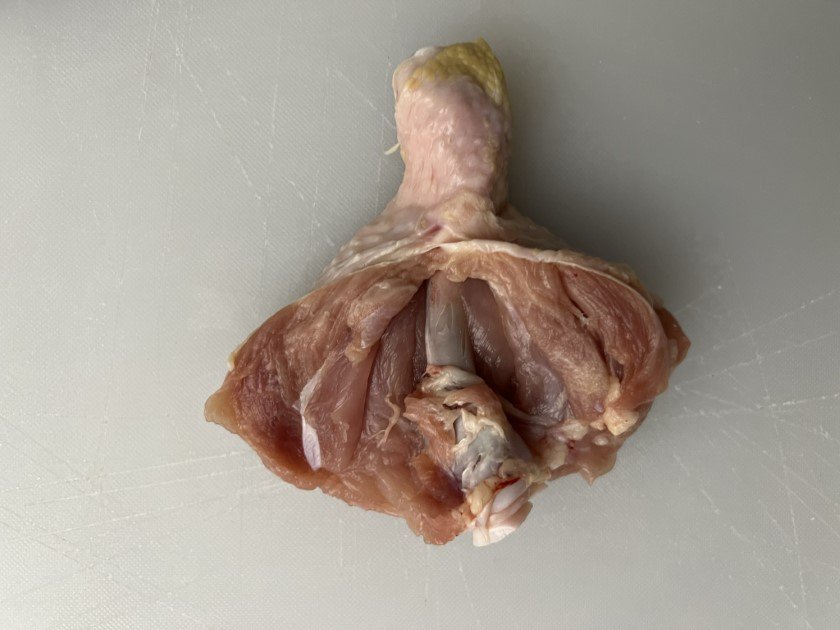
Butterflied chicken legs (also known as butterfly drumsticks), are chicken drumsticks that have been split open, with the bone still attached, allowing them to lay flat.
This technique not only makes the meat cook evenly but also ensures maximum surface area exposure to the grill’s heat.
It’s a culinary secret that turns a standard drumstick into a canvas for BBQ artistry.
The Anatomy of a Chicken Drumstick and How It’s Transformed
A chicken drumstick primarily consists of the lower leg bone, the meat, skin, and tendons. When you butterfly it, you’re making a strategic cut along the meatier side of the drumstick, ensuring the bone remains intact.
As you spread it open, the drumstick takes on a flatter shape, resembling a butterfly, hence the name.
Why Should You Butterfly Chicken Legs?
Butterflying chicken legs isn’t just a fancy culinary term, it brings with it a host of benefits that will elevate your BBQ game:
- Faster Cooking Time: Since the meat lies flatter after being butterflied, heat penetrates it more uniformly. This means your drumsticks cook quicker than their non-butterflied counterparts.
- Even Browning and Charring: A flat surface ensures even contact with the grill, giving you that beautiful charred texture and golden brown finish every BBQ pitmaster dreams of.
- Better Marinade Absorption: The increased surface area allows marinades and rubs to seep deeper into the meat. This results in drumsticks that are flavorful through and through.
- Easier Flipping and Handling: With the meat and bone laying flat, turning your drumsticks on the grill becomes a breeze. It reduces the risk of them getting burnt or sticking to the grates.
- Impressive Presentation: Let’s face it, butterflied drumsticks look gourmet. They can be the centerpiece of your BBQ spread, impressing your guests even before they take their first bite.
By mastering the art of butterflying you’re ensuring each bite of chicken is a flavor packed delight.
Choosing the Best Drumstick to Split
Not all drumsticks are created equal.
When selecting drumsticks to butterfly, consider the following:
- Size Matters: Larger drumsticks generally have more meat. It makes them easier to butterfly and offers a more satisfying end result.
- Fresh is Best: Always opt for fresh drumsticks over frozen. Fresh chicken tends to retain moisture better and offers a richer flavor.
- Skin On: While you can butterfly skinless drumsticks, retaining the skin gives you an added layer of flavor and that crave worthy crispy texture when grilled.
How to Butterfly Chicken Legs: Preparing the Chicken Drumsticks
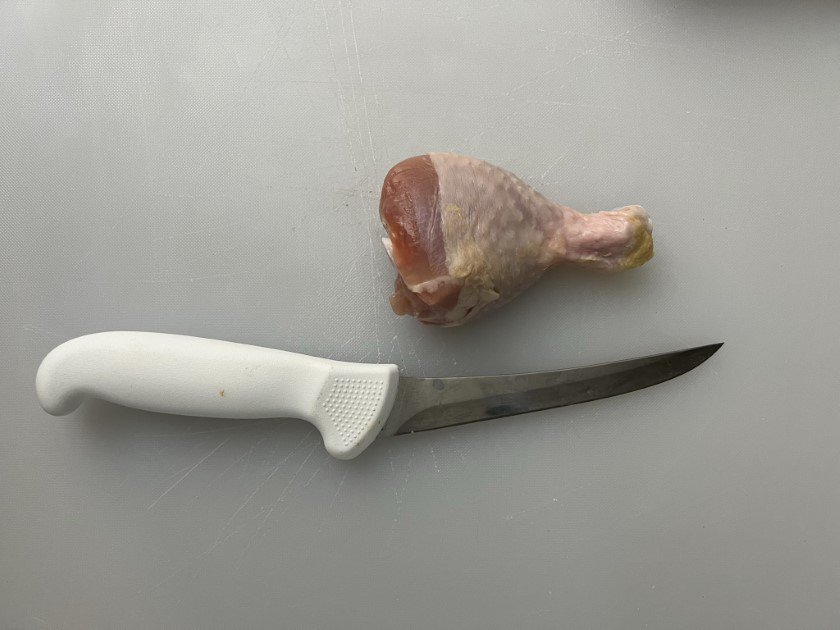
The art of butterflying chicken drumsticks is simpler than you might think.
With a sharp knife and a little practice, you can perfect this technique in no time!
Here’s a step by step guide:
1. Choose Your Drumstick:
Opt for a plump, meaty drumstick. Ensure it’s clean and free from any loose skin or feathers.
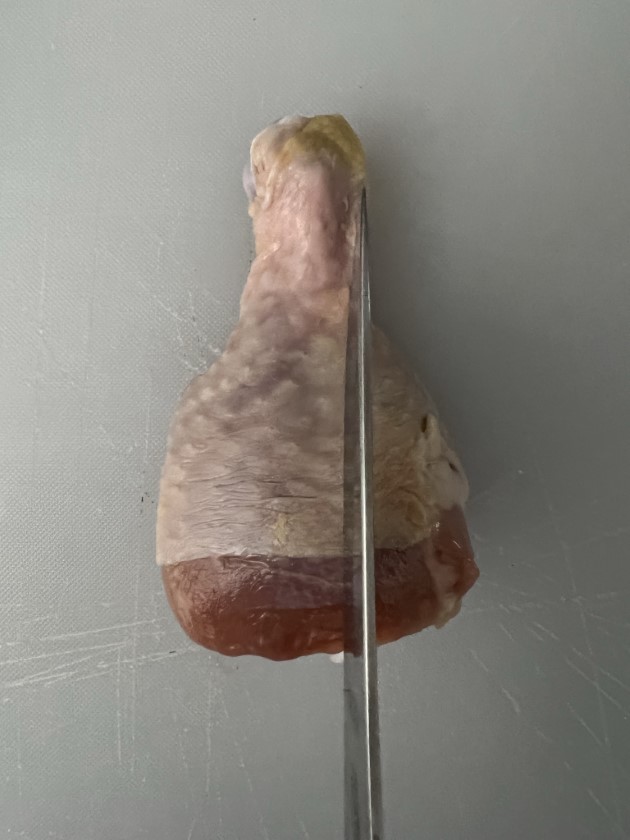
2. Place on a Cutting Board
Lay the drumstick on its side with the meaty portion facing up.
3. Make the Initial Cut
Using a sharp knife, make a cut down the length of the meaty part of the drumstick, starting from one end and finishing at the other. Be sure not to cut through the bone.
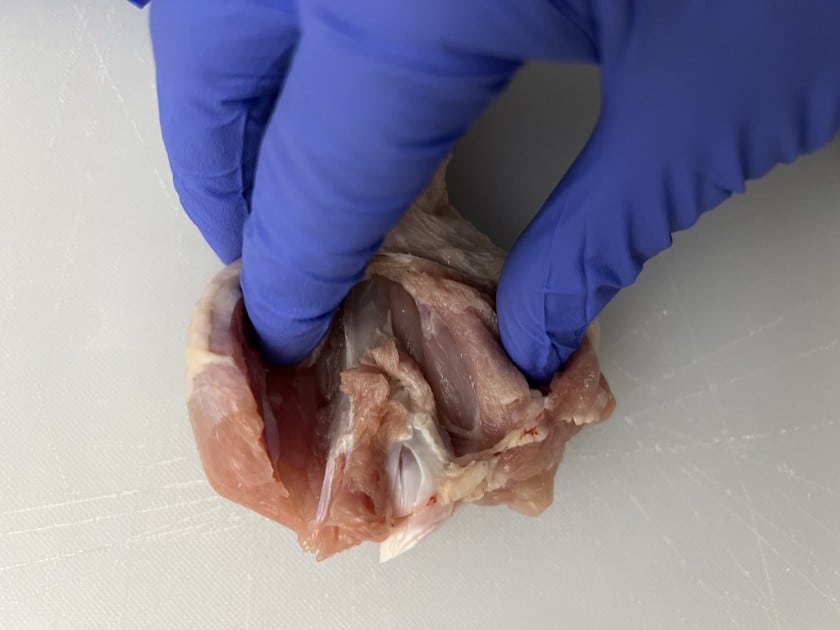
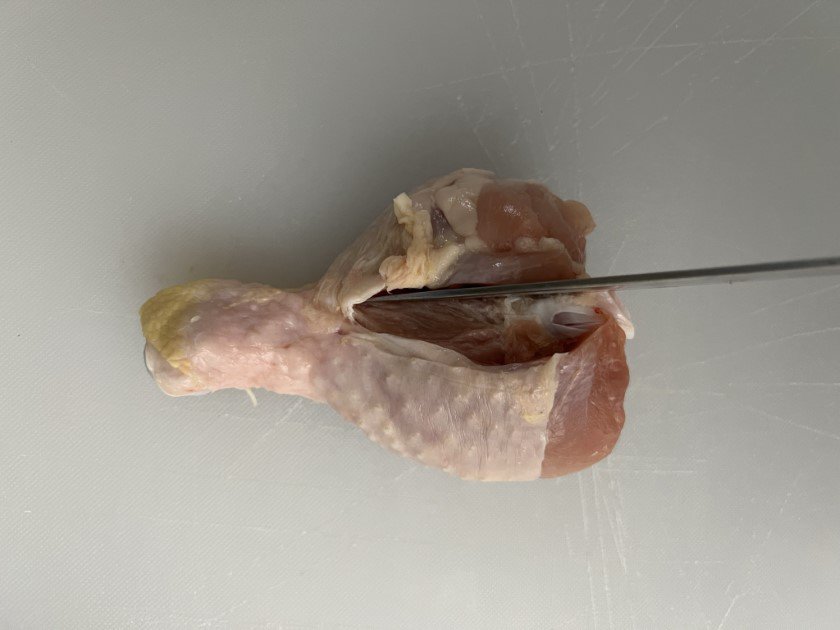
4. Open and Flatten
Gently spread the drumstick open using your fingers, pressing down to flatten it out. The bone should remain at the center, with the meat spread out on either side.
5. Trim Excess Fat
If you notice any extra fat or skin, trim it away for a cleaner look and better cooking results.
Grilling Butterflied Chicken Drumsticks
Preparing the Grill
The Weber Kettle, a timeless icon in the BBQ world, is your trusty ally in grilling these butterflied beauties to perfection.
Here’s how to set it up for optimal results:
- Clean the Grates: Begin with a clean grill. Brush off any previous residues to ensure your chicken doesn’t stick and to avoid any unwanted flavors.
- Charcoal Arrangement: Use quality charcoal briquettes. For butterflied drumsticks, set up a two zone fire. This means placing the charcoals on one half of the grill, leaving the other half without direct heat. This setup allows for both direct and indirect grilling.
- Preheat: Once your charcoals are white hot, place the cooking grate over them. Cover with the lid and let the Weber Kettle heat up for about 5-10 minutes.
- Adjust the Vents: Ensure the bottom vent is fully open, and adjust the top vent as needed to control the temperature. A medium heat is ideal for grilling drumsticks.
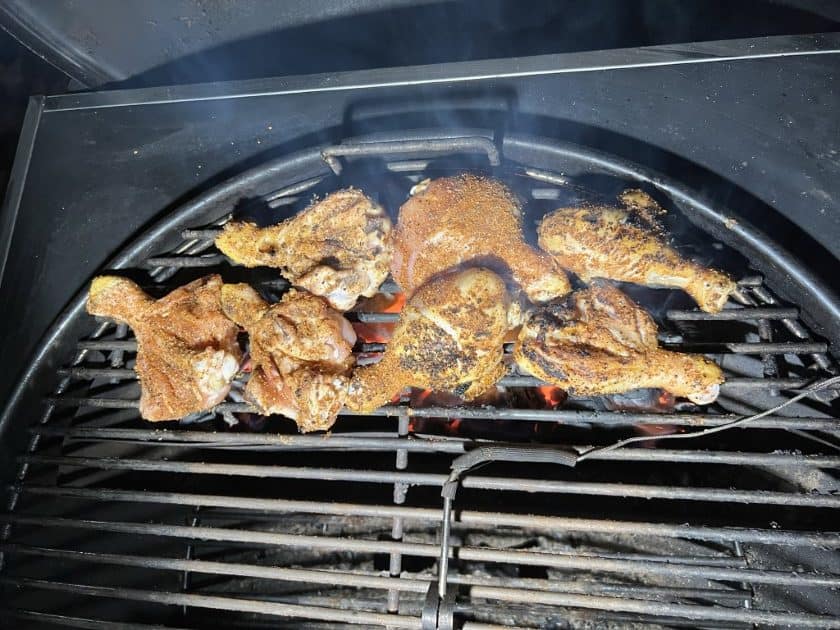
Grilling Techniques for Perfectly Cooked Drumsticks
With your Weber Kettle ready to go, here are some techniques to ensure your drumsticks are grilled to mouth watering perfection:
- Start with Direct Heat: Place the butterflied drumsticks on the side with the charcoals, skin side down. This will give them a nice sear and that delicious grilled flavor.
- Move to Indirect Heat: After a few minutes, once they’re nicely browned, move them to the side without charcoal. Cover and let them cook, absorbing the smoky flavor without the risk of burning.
- Monitor Temperature: Using a meat thermometer, ensure your chicken reaches an internal temperature of 165°F (74°C). This ensures they’re safely cooked through.
- Basting: If you have a sauce or marinade, brush it on during the last 10 minutes of grilling to infuse added flavor.
Alternative Cooking Methods
Air Fryer Butterfly Drumsticks
If you’re looking to venture beyond the grill, the air fryer offers a unique way to achieve that crispy finish without the oil.
- Preheat the Air Fryer: Set your air fryer to 375°F (190°C) and allow it to warm up for a couple of minutes.
- Prep the Drumsticks: Season your butterflied drumsticks as you would for grilling. A light brush of oil or cooking spray will help achieve a golden finish.
- Arrange in the Basket: Ensure the drumsticks are in a single layer and not overlapping, to ensure even cooking.
- Cooking Time: Air fry for about 10 minutes on each side, checking for that golden brown finish and ensuring the internal temperature reaches 165°F (74°C).
Other Chicken Leg Recipes
Smoking Butterflied Chicken Drumsticks
For those who love a deep, smoky flavor, smoking your drumsticks can be a real treat:
- Wood Chunk Selection: Hickory or applewood chips complement chicken beautifully.
- Preheat the Smoker: Aim for a temperature of around 225°F (107°C).
- Smoke: Once your smoker is ready and the wood chunks are smoking, place the drumsticks inside. Depending on the size, they’ll need between 1 to 2 hours.
- Final Check: As always, ensure your chicken reaches that crucial internal temperature of 165°F (74°C) before serving.
For those who like a little kick in their BBQ, this variation brings the heat!
- The Sauce: Combine equal parts melted butter and your favorite hot sauce. Add a teaspoon of apple cider vinegar and a pinch of garlic powder for added depth.
- Marinate: Brush the sauce generously over the drumsticks and let them marinate for at least 30 minutes.
- Grill: Follow the same grilling steps mentioned earlier. Baste with extra sauce in the last 10 minutes for a spicy glaze.
Honey Mustard Glazed Butterflied Drumsticks
A sweet and tangy twist for those who prefer a milder flavor:
- The Glaze: Mix together 4 tablespoons of honey, 2 tablespoons of Dijon mustard, a splash of soy sauce, and a sprinkle of garlic powder.
- Apply: Brush this delightful glaze over your butterflied drumsticks before grilling.
- Grill: As with the buffalo variation, grill as previously directed and reapply the glaze during the last 10 minutes for a shiny, flavorful finish.
Tips and Tricks
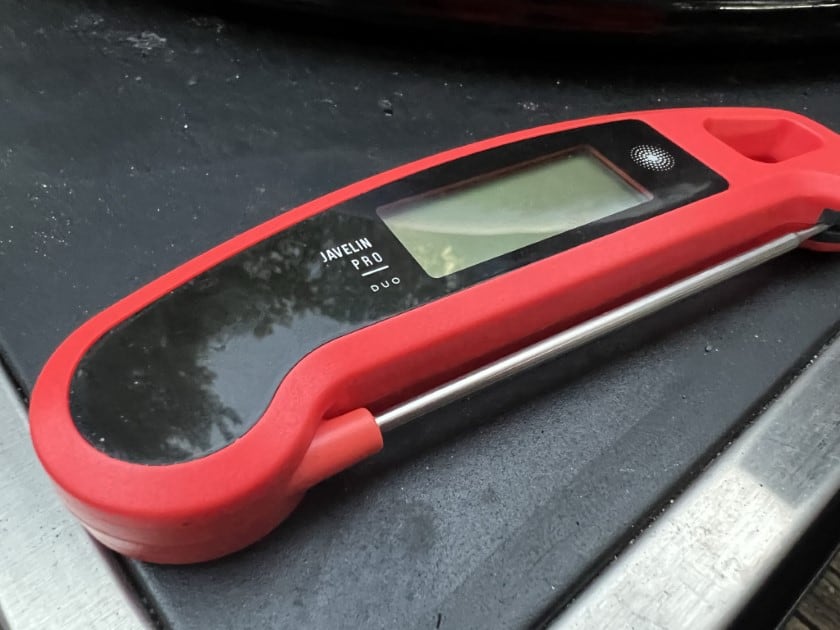
Using a Meat Thermometer
The secret to perfectly cooked chicken? A reliable meat thermometer.
Here’s how to use it effectively:
- Placement: Insert the thermometer into the thickest part of the drumstick without touching the bone. This ensures an accurate reading.
- Safe Temperature: Chicken should reach an internal temperature of 165°F (74°C) to ensure it’s safely cooked through.
- Digital vs. Analog: While analog thermometers are classic, digital ones often provide quicker and more precise readings.
Cooking Frozen Chicken Drumsticks (Legs)
Caught in a pinch with frozen drumsticks? No worries!
- Thawing: Thaw your drumsticks in the refrigerator overnight. If you’re short on time, you can use the defrost setting on your microwave, or submerge them in cold water (my go to method).
- cooking time: Remember, frozen (or partially frozen) drumsticks will require a longer cooking time. Always use a meat thermometer to ensure they’re fully cooked.
Marinating Techniques
Infusing flavor into your drumsticks is easy with the right marinade:
- Duration: For optimal flavor absorption, marinate your drumsticks for at least 2 hours. If you can leave them overnight, even better!
- Seal & Shake: Place your drumsticks and marinade in a resealable bag. This allows for easy mixing. Just give it a shake every now and then.
- Acid is Your Friend: Ingredients like lemon juice, vinegar, or yogurt help tenderize the chicken and enhance flavor absorption.
Step By Step Instructions for Butterflied Chicken Legs
1. Butterfly the Drumsticks
Make a lengthwise cut along the meaty portion of the drumstick without cutting through the bone.
Flatten out the meat on either side.
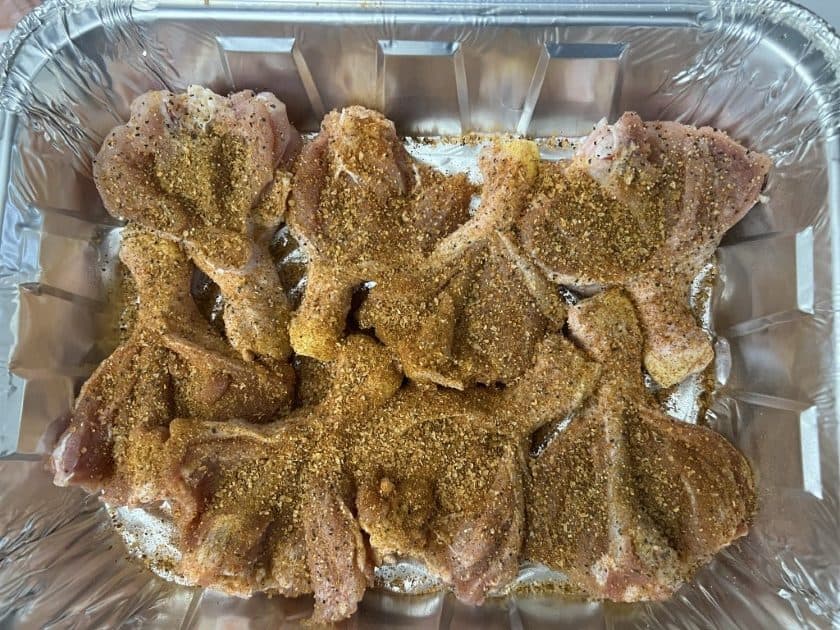
2. Prepare the Marinade
Whether it’s spicy buffalo, honey mustard, or your own creation, ensure the drumsticks are well-coated and let them marinate for optimal flavor.
3. Setup the Weber Kettle
Ensure clean grates and set up a two zone fire for both direct and indirect grilling.
Our guide on how to control the temp on your Weber Kettle will come in handy.
4. Preheat
Let the grill heat up for 5-10 minutes with the lid on.
5. Grill on Direct Heat
Start by placing the drumsticks skin side down on the direct heat side to get a good sear.
6. Shift to Indirect Heat
Move the drumsticks to the indirect side, cover the grill, and let them cook while absorbing the smoky flavor.
7. Monitor Temperature
Use a meat thermometer to check that drumsticks reach an internal temperature of 165°F (74°C).
8. Serve & Enjoy
Once grilled to perfection, let them rest for a few minutes, then dive in!
Serving Suggestions
Serving Suggestions: Pairing BBQ Butterflied Chicken Drumsticks With Sides
To round out your BBQ feast:
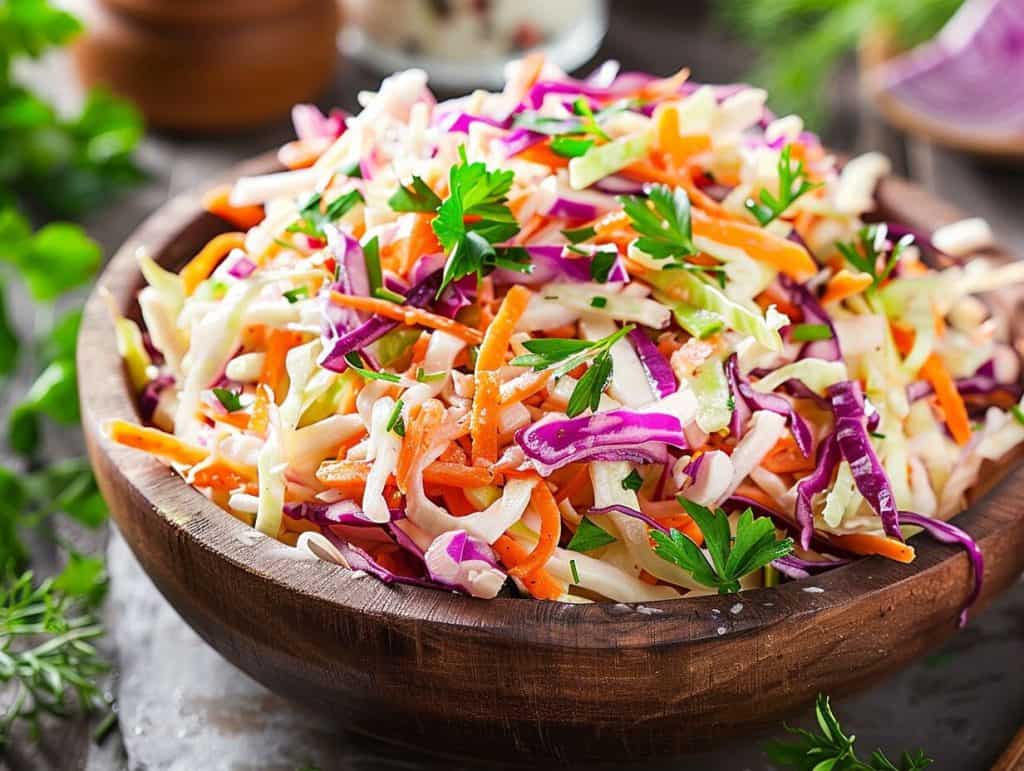
- Coleslaw: A refreshing coleslaw, with its creamy tanginess, complements the smoky flavor of the drumsticks.
- Cornbread: Serve warm buttered cornbread on the side for a delightful sweet and savory combination.
- Grilled Veggies: Zucchini, bell peppers, and asparagus grilled alongside your drumsticks add color and nutrition to your plate.
- Potato Salad: A classic BBQ side. Potato salad brings a hearty element to your meal.
Concerns About Overcooking or Undercooking Chicken Drumsticks
One of the biggest fears when grilling chicken is ending up with dried out or, worse, undercooked meat.
That’s where the art of butterflying and a trusty meat thermometer comes into play.
By ensuring even heat distribution and monitoring the internal temperature, you can guarantee perfectly cooked drumsticks every time.
Safety Measures When Handling Raw Chicken
Safety first!
- Always wash your hands before and after handling raw chicken.
- Use separate cutting boards for meat and veggies to avoid cross contamination.
- Ensure any utensils or dishes that touched raw chicken are thoroughly cleaned.
Flavor Variations and Dietary Preferences
Every palate is unique.
If spicy isn’t your thing, go for a milder marinade.
Want to cut down on sugar? Opt for a sugar free sauce or glaze.
The beauty of BBQ is its versatility. Experiment and find what suits your taste buds best!
Creating a Unique Marinade Using Unexpected Ingredients
Don’t be afraid to think outside the box!
Ingredients like pineapple juice, beer, or even coffee can add an unexpected twist to your marinade.
Experimenting with unique flavor combos makes your BBQ truly one of a kind.
Conclusion
There’s no denying the appeal of BBQ, and with the techniques and tips shared, you’re well on your way to becoming the ultimate grill master.
Butterflying chicken drumsticks not only speeds up the cooking process, it ensures every bite is infused with flavor.
As you embark on this BBQ journey, remember to have fun with it.
Experiment with flavors, marinades, and techniques.
BBQ is as much about the experience as it is about the food. So gather your loved ones, fire up that grill, and create memories that will last a lifetime.
Subscribe to our mailing list to grill the best drumsticks you’ve ever had!
Frequently Asked Questions
What is butterflying chicken?
Butterflying chicken involves making cuts to lay the chicken flat, which allows it to cook evenly and often faster.
Should you flip drumsticks?
Yes, flipping drumsticks ensures even cooking and browning on all sides.
How do you keep drumsticks from drying out?
To prevent drumsticks from drying out, marinate them before cooking and ensure you don’t overcook them. Using a meat thermometer helps monitor their doneness.
Do you call these drumsticks or chicken legs?
Both terms are used interchangeably, but u0022drumsticku0022 specifically refers to the lower part of the leg.
Recipe Card: BBQ Butterflied Chicken Drumsticks on the Weber Kettle
Awesome BBQ Butterflied Chicken Legs on the Weber Kettle Grill (Drumsticks)
Course: BBQ RecipesCuisine: AmericanDifficulty: Easy4
servings30
minutes40
minutes300
kcalBBQ butterflied chicken legs, also known as drumsticks, are a delectable dish perfect for grilling on the Weber Kettle. This recipe involves splitting the chicken legs along the bone to create a butterfly shape, allowing for quicker and more even cooking.
Ingredients
Chicken Drumsticks: 8
Optional: Your choice of marinade/sauce: As required
Optional: wood chunks for added smokiness (like applewood or mesquite)
Directions
- Butterfly Drumsticks: Lay each drumstick on its side and make a lengthwise cut along the meaty portion, ensuring not to cut through the bone. Flatten out the meat.
- Marinate: Coat drumsticks generously with your chosen marinade or sauce. Let sit for at least 30 minutes or overnight for optimal flavor.
- Prepare the Weber Kettle: Clean grates and set up for a two zone fire.
- Preheat the Grill: Let the grill heat for 5-10 minutes.
- Grill Drumsticks: Start on direct heat for a good sear, then shift to indirect heat to cook through.
- Check Temperature: Ensure drumsticks reach an internal temperature of 165°F (74°C).
- Rest and Serve: Allow drumsticks to rest for a few minutes before serving.
Recipe Video
Notes
- Serving Suggestions: Pair with coleslaw, cornbread, grilled veggies, or potato salad.
- Optional Tips: Use flavored wood chunks for a deeper smoky aroma. Experiment with different marinades to find your perfect flavor combination.