Awesome Beer Can Chicken on the Weber Kettle Grill
What is Beer Can Chicken?
Beer Can Chicken is a popular barbecue method that involves cooking a whole chicken in an upright position, perched on a partially filled can of beer.
This technique allows the beer to steam the chicken from the inside, resulting in juicy, flavorful, and tender meat. The exterior achieves a beautifully crisped and browned skin.
The essence of the beer gently infuses the chicken, marrying the tender fibers of the poultry with a maltiness that’s rich yet never overpowering.
The robust smokiness enveloping the chicken and the crisp, tantalizing skin formed by the heat of the Weber Kettle Grill have carved many a memory into my summer afternoons.
In This Recipe
- What is Beer Can Chicken?
- Beer Can Chicken Weber Kettle Recipe Card
- Benefits of Cooking Beer Can Chicken on the Weber Kettle Grill
- Choosing the Right Chicken: How to Pick the Right Chicken for Beer Can Chicken?
- Preparing the Weber Kettle Grill: How to Set Up the Weber Kettle Grill for Beer Can Chicken
- Seasoning and Rub: Crafting a Flavorful Crust
- How Do You Cook Beer Can Chicken on the Weber Kettle Grill?
- Cooking Time and Temperature
- Checking the Doneness of the Chicken
- Tips and Tricks for a Perfect Beer Can Chicken
- Keeping the Chicken Moist
- Getting Crispy Skin
- Variations and Additional Tips
- Serving and Enjoying Beer Can Chicken
- Wrapping up Beer Can Chicken on The Weber Kettle
- Frequently Asked Questions
Beer Can Chicken Weber Kettle Recipe Card

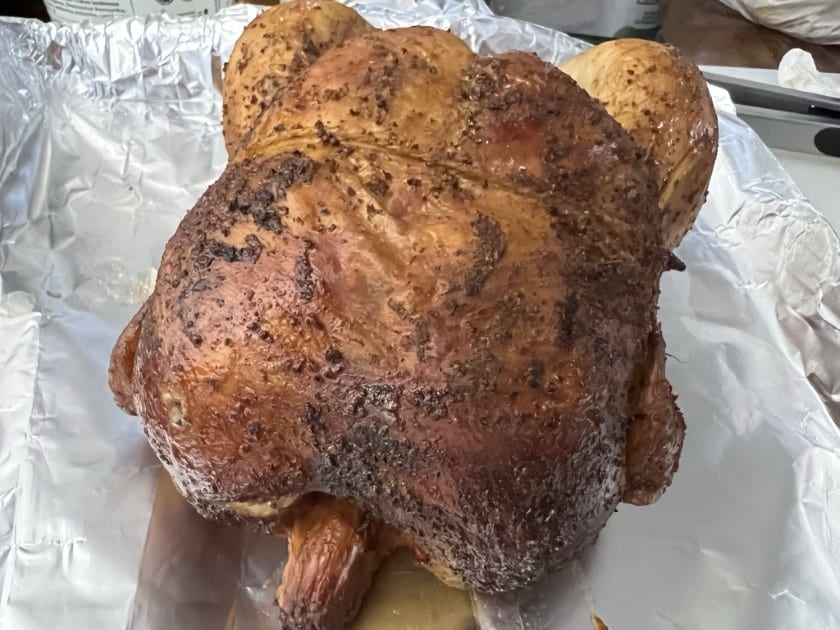
Juicy Beer Can Chicken on the Weber Kettle Grill
Course: BBQ RecipesCuisine: AmericanDifficulty: Easy4
servings30
minutes40
minutes600
kcalJuicy beer can chicken smoked to perfection on the Weber Kettle grill.
Ingredients
1 whole chicken (4-5 lbs)
2 tbsp of Dizzy Pig Wonderbird rub (or your preferred rub)
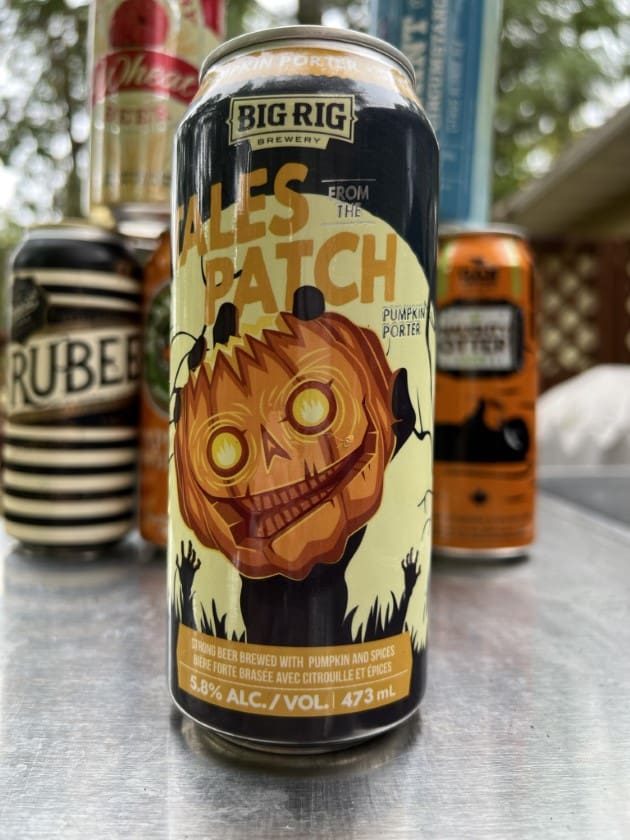
1 can of beer (12 oz)
Wood chunks (apple or cherry for best results)
Charcoal Briquettes (approx. 80 for surrounding the Vortex and 30 for the chimney)
Directions
- Dry Brining: For a crispier skin, consider dry brining the chicken. Generously season it with salt and leave it uncovered in the refrigerator overnight or from the morning of the day you plan to grill.
- Preparation: Remove the chicken from the refrigerator and let it sit at room temperature for about 30 minutes before grilling. Clean it inside and out, then pat it dry.
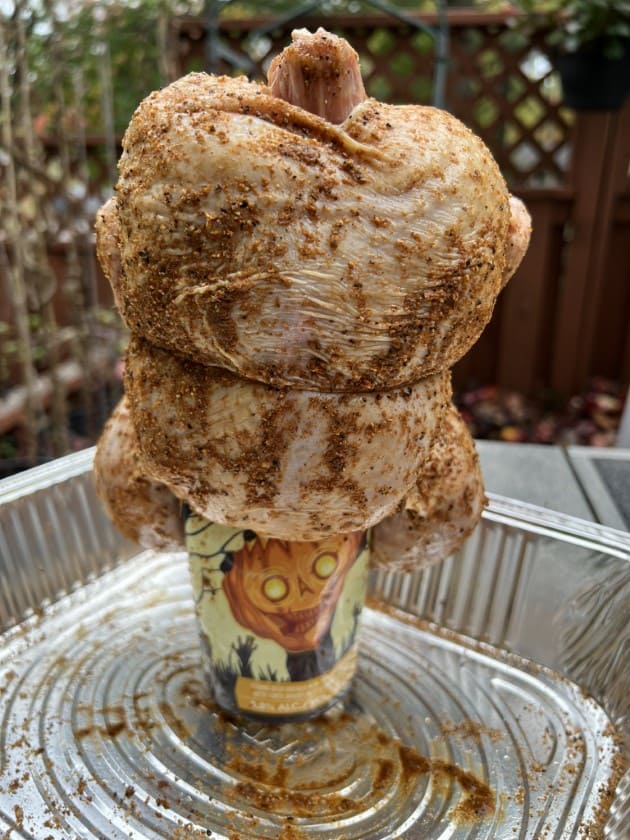
- Rub Application: Generously apply the Dizzy Pig Wonderbird rub all over the chicken, ensuring it’s evenly coated.
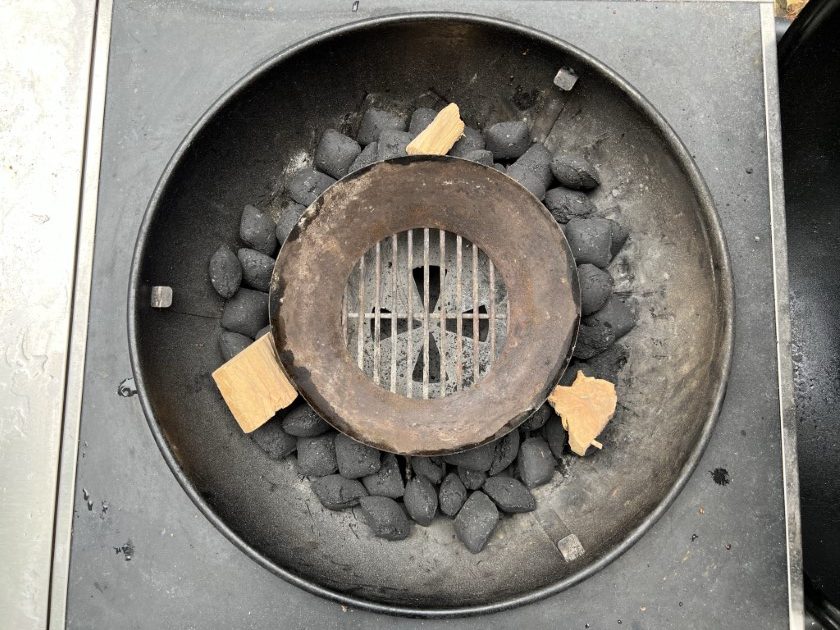
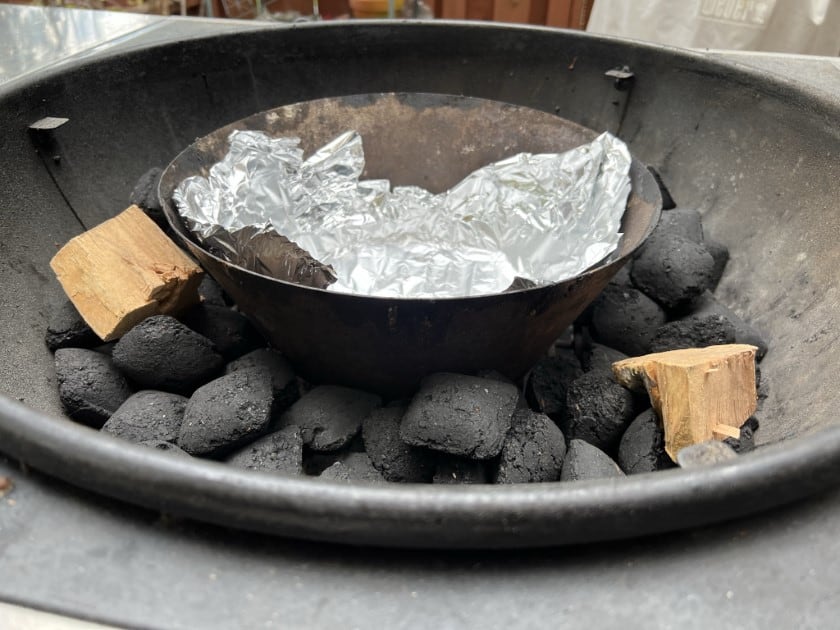
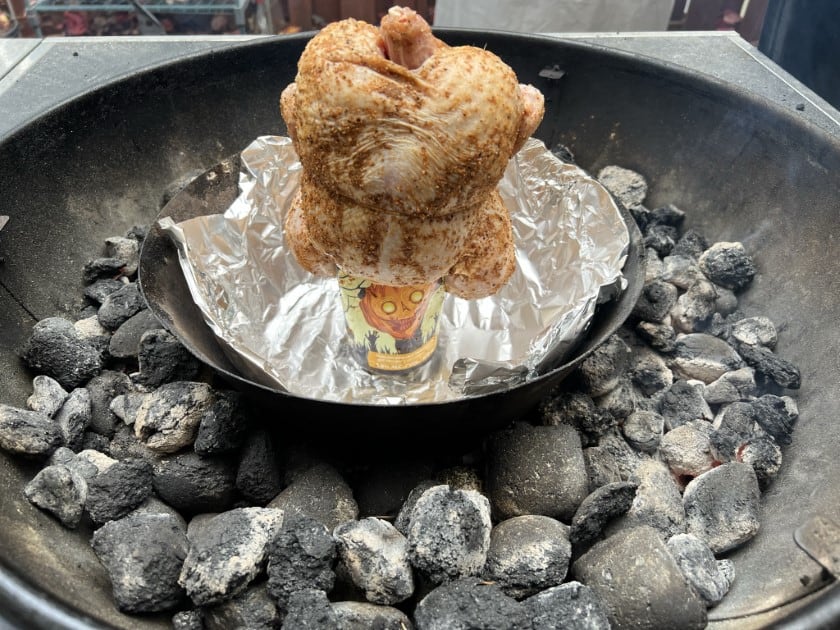
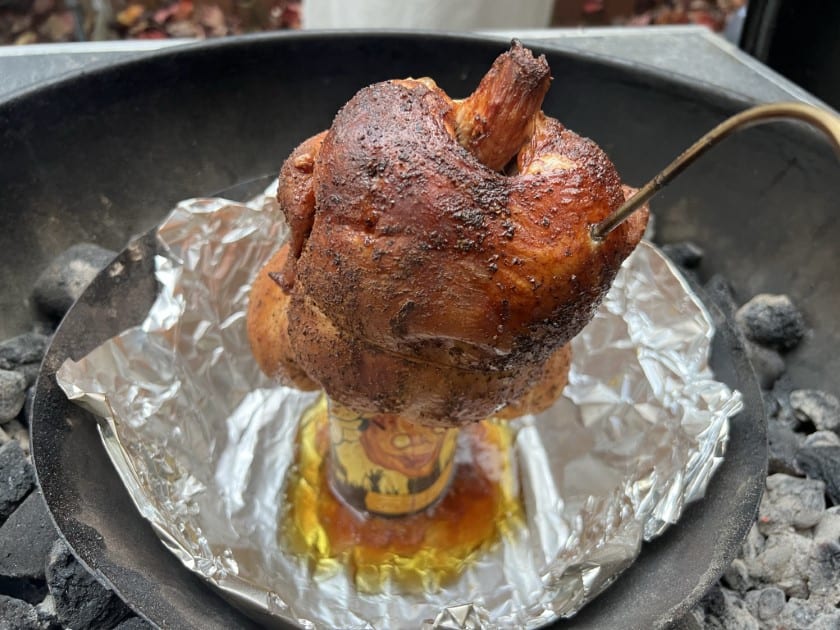
- Grill Setup: Remove the cooking grate from the Weber Kettle Grill. Place the Vortex in the middle of the charcoal grate with the wider side facing up. Lay a foil beneath the Vortex to catch the drippings.
- Charcoal Placement: Arrange about 80 briquettes around the Vortex. Scatter a few apple or cherry wood chunks on top of the briquettes.
- Lighting the Grill: Using a chimney starter, light 30 briquettes. Once ashed over, distribute them evenly around the Vortex.
- Beer Can Placement: Empty out half the beer can (you can drink it!). Place the chicken onto the beer can, ensuring it’s securely seated.
- Grilling: With the Vortex acting as a deflector, place the beer can chicken in the center of the charcoal grate, surrounding the vortex with the lit coals.
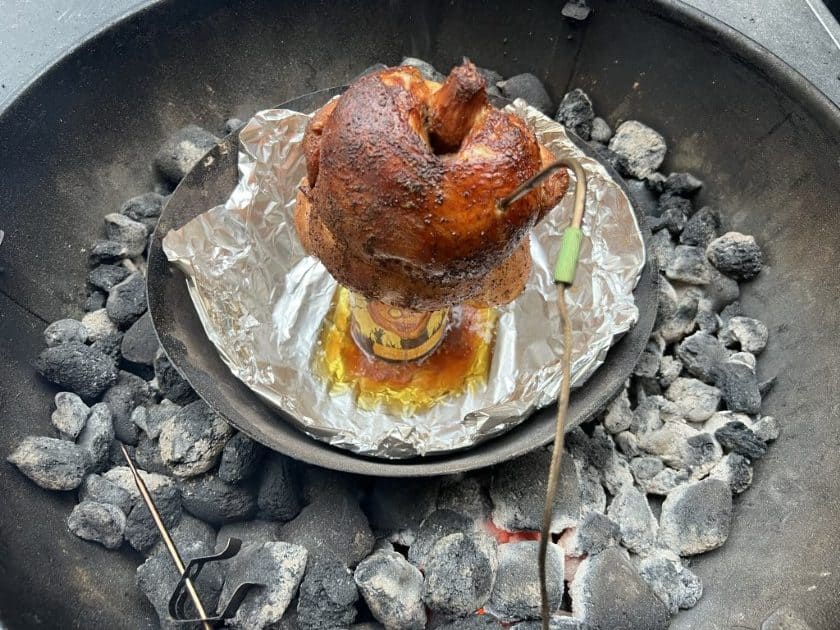
- Monitoring Temperature: Insert a 5G WiFi wireless meat thermometer into the thickest part of the chicken to monitor the temperature. Aim for a cooking temperature of 375°F.
- Cooking: Grill the chicken for about 1 to 1 ½ hours or until the internal temperature reads 165°F for the breast and 175°F for the thighs.
- Rest and Serve: Once cooked, remove the chicken from the grill and let it rest for 10-15 minutes. Carve, serve, and enjoy!
Notes
- Monitor your chicken’s temperature remotely with the benefits of a 5G WiFi meat thermometer, ensuring perfect results without constant supervision.
- Pair with your choice of sides, from grilled veggies to a fresh salad, for a complete meal.
Keep Reading To Perfect Beer Can Chicken
Keep reading for all the tips and tricks to make your next beer can chicken the best you’ve ever made.
Benefits of Cooking Beer Can Chicken on the Weber Kettle Grill
Why Use the Vortex on the Weber Kettle Grill for Beer Can Chicken?
Utilizing the vortex attachment (wide side up) on the charcoal grate of a Weber Kettle Grill for Beer Can Chicken enhances heat distribution, focusing the heat upwards and circling around the chicken, which ensures an even, crispy skin.
The interior remains succulently moist from the beer can below.
The usual cooking grate is removed, allowing the chicken to be centrally placed, optimizing the heat vortex effect.
Choosing the Right Chicken: How to Pick the Right Chicken for Beer Can Chicken?
Selecting the right chicken involves choosing a fresh, high quality bird, ideally weighing between 3.5 to 4.5 pounds.
A smaller size ensures the chicken cooks thoroughly and fits well with the beer can and vortex setup.
Preparing the Weber Kettle Grill: How to Set Up the Weber Kettle Grill for Beer Can Chicken
Setting Up the Weber Kettle Grill: A Step by Step Guide
Setting up the Weber Kettle Grill involves:
- Remove the Cooking Grate: Start with an empty Weber Kettle Grill, ensuring the cooking grate is removed to accommodate your setup.
- Place the Vortex: Install the vortex in the middle of the charcoal grate with the wide side facing up, creating an efficient heat circulation system for indirect cooking.
- Add Foil for Cleanliness: Position a piece of aluminum foil underneath where the chicken will sit on the vortex, to catch any drippings and maintain a clean cooking area.
- Arrange the Charcoal: Neatly place charcoal around the vortex, ensuring even distribution to maintain a stable and uniform cooking temperature throughout the grilling process.
- Scatter Wood Chunks: Intersperse a few wood chunks amongst the charcoal to infuse the chicken with a smoky, hearty aroma as it cooks.
- Lighting the Charcoal: Utilize a chimney starter to light the charcoal efficiently, allowing it to heat up before transferring the lit coals to surround the vortex, ensuring a consistent and reliable heat source.
For cooking Beer Can Chicken using a vortex on a Weber Kettle Grill, you’ll want to ensure you have enough charcoal to maintain a steady, indirect heat for the duration of the cooking process (which is typically around 1 to 1.5 hours).
How Much Charcoal To Use?
Here’s a generalized guideline:
- Around the Vortex: Position approximately 40-50 charcoal briquettes around the vortex, ensuring they are evenly distributed to facilitate consistent heat.
- In the Chimney Starter: Light about 30 briquettes in your chimney starter. Once they’re nicely ashed over and glowing, carefully distribute them among the unlit briquettes around the vortex. The lit coals will gradually ignite the unlit ones, providing a sustained heat source throughout the cooking period.
Adjustments might be needed based on specific conditions like outdoor temperature, wind, and the size of the chicken, to maintain the desired grill temperature of around 350°F (around 175°C) for cooking Beer Can Chicken.
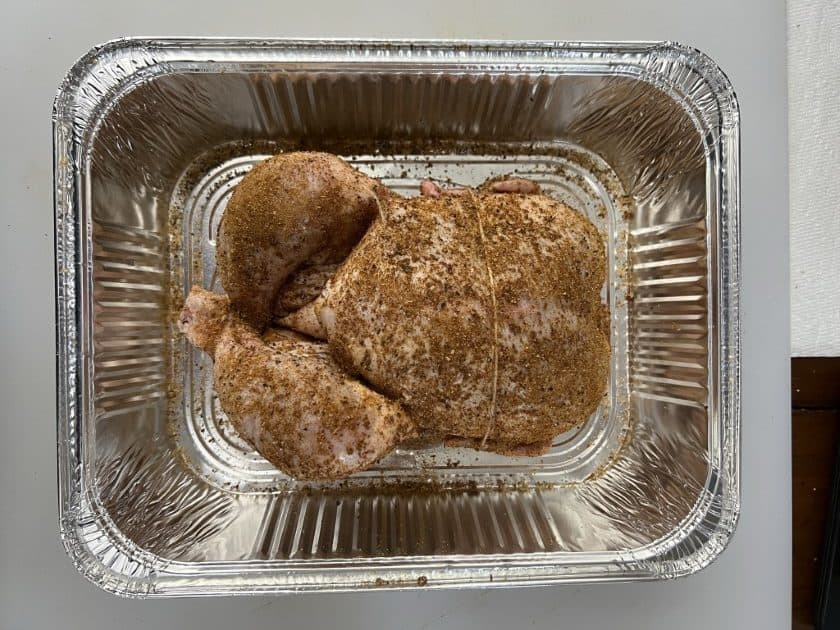
Seasoning and Rub: Crafting a Flavorful Crust
Choosing a rub is an intimate journey through your flavor preferences, and sometimes, relying on a tried and true favorite ensures a spectacular outcome.
I’ve often found solace in a shaker of Dizzy Pig’s Wonderbird rub.
A personal favorite, its harmonious blend of spices infuses the chicken with an unparalleled depth of flavor, creating a layer that tantalizes the taste buds and elevates the succulence of the meat to new heights.
Your rub, be it a homemade concoction or a cherished store bought blend like Wonderbird, becomes the secret ingredient.
How to Create a Flavorful Rub for Beer Can Chicken?
Creating a flavorful rub for Beer Can Chicken involves blending spices, herbs, and seasonings into a mix that’s generously applied to the chicken, infusing every bite with rich, savory, and slightly spicy notes.
A good rub enhances natural flavors and forms a delectable crust as it grills.
For those exploring the creation of a delightful chicken rub, here’s a popular blend often cherished by grill enthusiasts for its well balanced and harmonious flavor profile:
- Brown Sugar: 1/2 cup (110g)
- Paprika: 1/4 cup (30g)
- Kosher Salt: 3 tablespoons (43g)
- Black Pepper: 1 tablespoon (14g)
- Garlic Powder: 1 tablespoon (14g)
- Onion Powder: 1 tablespoon (14g)
- Chili Powder: 1 tablespoon (14g)
- Cayenne Pepper: 1 teaspoon (5g)
This rub brings together the sweetness of brown sugar, the smokiness of paprika, the zesty punch of garlic and onion, the heat from cayenne, and the aromatic allure of chili powder.
It creates a well rounded, flavorful embrace for your chicken.
Feel free to tweak the proportions to make it your own. Perhaps a bit more cayenne for heat lovers, or an extra dash of brown sugar for a sweeter crust!
How Do You Cook Beer Can Chicken on the Weber Kettle Grill?
Cooking Beer Can Chicken on the Weber Kettle Grill involves:
- Setting up for indirect grilling using a Vortex.
- Placing the chicken (seasoned and mounted on a can of beer) centrally above it.
- Cooking under a closed lid until perfectly done.
The Vortex effectively circulates heat around the chicken, ensuring a crispy exterior while maintaining a succulent interior, resulting in a delicious experience.
The aroma of the chicken, seasoned beautifully with your chosen rub, wafts through the air as it grills, the skin slowly crisping to perfection while the inside basks in the moist environment created by the evaporating beer.
This method not only imparts a subtle malt flavor to the meat but also ensures it remains juicy and tender throughout the cooking process.
Cooking Time and Temperature
What is the Ideal Cooking Time and Temperature for Beer Can Chicken?
Cooking Beer Can Chicken to perfection requires maintaining a steady grill temperature of around 350°F (approximately 175°C) and allowing it to cook for about 1 hour and 15 minutes to 1 hour and 30 minutes.
Ensuring the internal temperature of the chicken reaches at least 165°F (74°C) guarantees a safe, juicy, and perfectly cooked result.
Checking the Doneness of the Chicken
How Do You Check the Doneness of Beer Can Chicken?
Checking the doneness of Beer Can Chicken involves ensuring it reaches a minimum internal temperature of 165°F (74°C) at the thickest part without touching the bone, typically in the thigh.
Utilizing a reliable meat thermometer ensures precise measurement, guaranteeing a result that is safely cooked and satisfyingly juicy.
Why Use a Meat Thermometer When Grilling Beer Can Chicken?
A meat thermometer, particularly a 5G WiFi enabled one, is indispensable for grilling Beer Can Chicken ensuring it achieves a safe and perfect internal temperature of 165°F (74°C).
It offers a precise, convenient, and remotely accessible method to monitor the cooking process.
It helps guarantee a juicy, safe, and flavorful outcome.
The 5G WiFi connectivity allows for real time monitoring of your chicken’s internal temperature from virtually anywhere, meaning you’re not tethered to the grill and are free to entertain guests, prepare side dishes, or even enjoy a moment of relaxation, all while keeping a vigilant eye on your grilling bird.
The benefits extend to receiving timely alerts, ensuring that you can precisely navigate the fine line between undercooking and overcooking, leading your Beer Can Chicken to be a delectable symphony of crispy, juicy, and safe indulgence.
Tips and Tricks for a Perfect Beer Can Chicken
When it comes to grilling a scrumptious Beer Can Chicken, every grill master has a few tricks up their sleeve that transform a good dish into a great one.
Let’s uncover a few of those secrets together:
- Stability is Key: Ensure your chicken is stable on the beer can and grill to avoid toppling over during cooking. Employing a chicken stand or creating a stable base with vegetables can provide extra support.
- Size of Can: A regular can of beer works better than a tall boy. A tall boy raises the chicken too high off the grill grate. I only had big boys lying around so had to go tall.
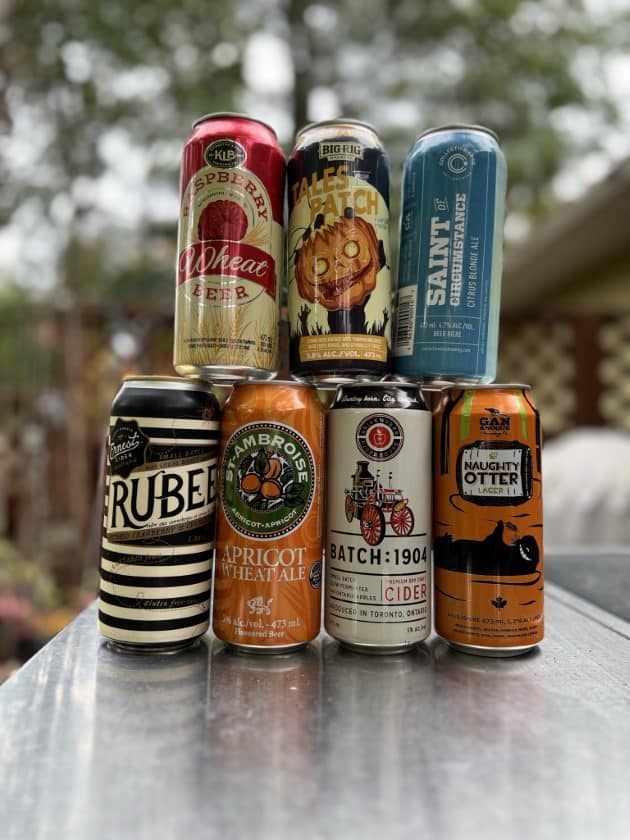
- Steaming from Inside: Opt for a beer that complements the rub. The evaporating beer keeps the chicken moist and infuses it with additional flavor. Feel free to experiment with different brews to discover unique flavor combinations.
- Patience Pays Off: Resist the urge to frequently check on the chicken. Maintaining a consistent temperature within the Weber Kettle Grill is crucial for even cooking and crisp skin. Trust your wireless meat thermometer to keep you informed and patiently await that perfect 165°F.
- Let it Rest: Once cooked to perfection, allow the chicken to rest for about 10-15 minutes before carving. This allows the juices to redistribute throughout the meat, ensuring every bite is succulent.
- Safety First: Be cautious when removing the beer can as it will be extremely hot. Using tongs and a fork, gently separate the can from the chicken over a tray to catch any drippings.
Adding these tips to your grilling routine is sure to elevate your Beer Can Chicken to new heights!
Keeping the Chicken Moist
How to Keep Beer Can Chicken Moist While Grilling?
Keeping Beer Can Chicken moist while grilling involves selecting a quality bird, utilizing a flavorful beer for internal steaming, and allowing the chicken to rest post grilling to retain its juice.
One of the pivotal actors in this play of flavors and textures is, of course, the beer.
As the beer gently simmers and steams from within, it imbues the chicken with its character, ensuring that the meat remains sumptuously moist and tender from the inside out.
But the beer isn’t working alone in this endeavor.
Finally, allowing the chicken to rest post grilling lets the juices, which have been excited and scattered by the heat, to relax and redistribute.
Getting Crispy Skin
How to Achieve Crispy Skin on Beer Can Chicken?
To achieve crispy skin on Beer Can Chicken:
- Utilize dry brining to enhance moisture removal.
- Cook at a precise temperature of 375°F (190°C).
- Apply a light coat of oil or fat to the skin (optional but helps).
These tips guarantee a delightful crunch that impeccably complements the juicy meat beneath.
Variations and Additional Tips
What Variations and Additional Tips Can Enhance Beer Can Chicken?
The delightful journey of making Beer Can Chicken on your Weber Kettle Grill can be further enriched by embracing culinary creativity and experimentation.
- Instead of strictly adhering to beer, consider diversifying your beverage options. For example, substituting beer with cider introduces a sweet, fruity note to the chicken, while using cola can infuse the meat with a caramelly, slightly acidic undertone, offering novel flavor profiles to explore.
- In the realm of rubs and marinades, the sky’s the limit! From spicy, to herbaceous, to sweet and tangy, playing with different combinations of herbs, spices, and sauces can dramatically alter and elevate the final product.
- And let’s not forget the enchanting allure of smoke! Experimenting with different types of wood chunks, like applewood for a sweet, mild smokiness or mesquite for a strong, hearty flavor, can add an additional layer of complexity to your Beer Can Chicken.
Serving and Enjoying Beer Can Chicken
How to Serve and Enjoy Beer Can Chicken?
To serve and enjoy Beer Can Chicken, allow it to rest for at least 10-15 minutes after cooking.
Carefully remove the beer can, carve the chicken into desired portions, and pair it with sides like grilled vegetables or a fresh salad.
Enhance the meal with complementing flavors and textures.
Pairing your Beer Can Chicken with a selection of sides enhances the dining experience, whether it be the charred sweetness of grilled vegetables, the light, crisp freshness of a green salad, or the comforting, fluffy texture of mashed potatoes.
Wrapping up Beer Can Chicken on The Weber Kettle
There’s an indescribable joy in venturing into the world of grilling, especially when the dish in question is as flavorful and intriguing as the Beer Can Chicken.
The Weber Kettle, with its versatility and unique design, especially when paired with the Vortex, ensures an even cooking environment.
This, combined with the flavors of beer steaming from within and your choice of rub (Dizzy Pig Wonderbird), guarantees a dish that’s bursting with flavor.
Juicy on the inside, and delightfully crispy on the outside!
And while the process itself is enjoyable, the ultimate satisfaction comes when you carve into that golden bird, seeing the fruits of your labor, and sharing it with loved ones.
To continue diving deeper into the world of BBQ and grilling, and to receive more recipes, tips, and personal insights, Subscribe to the mailing list.
Happy grilling!
Frequently Asked Questions
How do you arrange charcoal for beer can chicken?
Arrange approximately 80 briquettes around a Vortex placed in the center of your Weber Kettle’s charcoal grate. Light 30 briquettes in a chimney starter and, once ashed over, distribute them evenly around the Vortex.
What kind of beer do you use to make beer can chicken?
Any standard lager or pale ale will work for beer can chicken. The choice ultimately depends on your personal preference.
How long does it take to cook chicken on a Weber charcoal grill?
For beer can chicken on a Weber charcoal grill, it typically takes about 1 to 1 ½ hours at 375°F.
Can you use soda instead of beer for beer can chicken?
Yes, soda can be used as a substitute, offering a different flavor profile to the chicken.